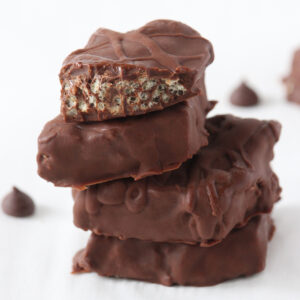
Crispy Chocolate Bars
These frightfully easy chocolate bars are the perfect treat with just 4 simple ingredients, for Halloween or any time you are craving something sweet!
Ingredients
Crispy Chocolate Bars
- 1 ½ cups dairy-free semi-sweet chocolate chips* (you could also use a bar of dairy-free chocolate as well)
- 1 tsp coconut oil
- 1 cup brown rice crispies (puffed white rice or puffed quinoa will also work)
- pinch of sea salt
Chocolate Coating (Optional)
- 1-1½ cup dairy-free semi-sweet chocolate chips* (you could also use a bar of dairy-free chocolate as well)
- 1 tsp coconut oil
- pinch of sea salt
Halloween Decorating (Optional)
- ½ cup powdered sugar (refined sugar-free)
- 1-2 tsp almond milk (or any dairy-free milk of your choice)
- a handful of dairy-free semi-sweet chocolate chips
Equipment
- small-medium stainless steel bowl (or heatproof glass bowl)
- small saucepan
- silicone spatula (large metal spoon)
- measuring cups and spoons
- metal spoons
- parchment paper
- baking tray
- oven mitts
- ziplock bags
Instructions
CHOCOLATE MAKING
Melting the Chocolate (Double Boiler)
- Get a baking tray (that will fit into your freezer) and line with parchment paper, set aside.
- Fill your saucepan with 1-2 inches of water and place it on the stove. Place the stainless steel bowl on top of the saucepan — the two should sit tightly together. You don't want a gap, as heat will escape. You also want to make sure the bowl does not touch the water, as it may burn the chocolate. Turn up the heat to high.
- Once you hear the water start to boil, add the coconut oil.
- After the oil is melted down (after 1-2 minutes) add the chocolate chips. Stir the chocolate constantly with your silicone spatula or spoon to help melt the chocolate. Then add in pinch of sea salt.
- Once you see the chocolate starting to melt down to a liquid consistency, cut the heat and remove it from the double boiler. It's fine if it's not all melted down, the residual heat from the bowl will help melt it all down. Once melted down, the chocolate should be a nice liquid-syrup consistency with a nice glossy sheen that slowly drips off your spatula or spoon. Let it cool down for 2-3 minutes. Remove ¼ cup of the chocolate in a separate bowl and set aside.
CRISPY CHOCOLATE BARS
- Slowly add the brown rice crispies into the melted chocolate bowl and fold in gently until everything is well incorporated and all crispies are covered with chocolate.
- Transfer the mixture onto the baking tray with parchment paper and press down on the tray with a spoon or spatula to bring everything together and press the edges to form a rectangle or square.
- Add the reserved melted chocolate over the mixture and use the back of your spoon or spatula to smooth over the mixture. This will help fill all the nooks and crannies with chocolate and ensure the mixture stays together, and doesn't crumble. Once you are done, place the tray in the freezer for 20-30 minutes.
- NOTE: When I created these bars, I personally liked that the pieces were not uniform and each one was a different size and shape. However, if you prefer them to be more uniform, you can just score the bars with a knife to the desired shape and size you want before placing them in the freezer.
- After they are set, remove them from the freezer and let them rest at room temperature for 10 minutes. Then with a knife gently press into the block to break up the pieces. As you press down they will naturally break off into pieces. Alternatively, if you scored them before placing them in the freezer you will have your uniform pieces. You now have some yummy crispy chocolate bars, ready to enjoy! However if you want to take them a step further to give them a real store-bought chocolate bar feel, continue on for the next steps.
CHOCOLATE COATING (OPTIONAL)
- Repeat the steps of the chocolate melting process. Once the chocolate has melted and has cooled down for 2-3 minutes (We don't have it too hot, as it may melt the frozen chocolate bar pieces) gently place each bar piece one at a time into the melted chocolate. Move them around, spoon the chocolate over the piece until all sides are covered. Gently take them out and place them on the baking sheet.
- Repeat until all Crispy Chocolate Bars are coated with the chocolate and place them back in the freezer for 20-30 minutes to set.
- Once everything is set, take them out and leave them at room temperature for about 5 minutes and eat!
DECORATING (OPTIONAL)
- If you want to take these Crispy Chocolate Bars a step further and really get into the festive spirit, here are a few options to try out after coating your crispy chocolate bars:• CHOCOLATES: Take the remaining melted chocolate and drizzle on top of the Crispy Chocolate Bars. This will create a nice decorative finish to the bars. • SPRINKLES: add fun colourful sprinkles to brighten them up and add a splash of fun • NUTS: use some chopped nuts like almonds, walnuts, or pistachios for some added crunch.• ICING: create some pretty, dairy-free icing with ½ cup of powdered sugar and 1 tsp of dairy-free milk (white). Add the milk slowly as it is easy to add too much and tricky to adjust after. Add the mixture into a ziplock bag, close and push the mixture to the edge and make a small cut at the corner of the bag. You now have your own do-it-yourself piping bag! (If you have a piping bag you can use that as well). Be sure to practice on the parchment paper as the flow may come out too fast. Now is the fun part go ahead and decorate whatever design you'd like! You can even add some natural food colouring if you want to jazz them up even more. Honestly, the possibilities are endless. Just have fun with it and bring out your inner artist!
Notes
* This recipe makes 15 chocolate bar pieces.
** I used Camino Semi-Sweet Chocolate Chips as they are the ones I personally love but feel free to use whatever ones you like.
*** Store in the freezer for a week in an airtight container or tin. Store in the freezer for 1-2 months in an airtight container, but that is if they last that long.
**** I added chocolate chips to create eyes but you could also use candy eyes if you wanted as well.
NOTE: Sometimes the chocolate may start to thicken up if too much time has passed, not to fret. Just place the bowl back on the double boiler, and melt the chocolate down again.
MELTED CHOCOLATE: You may have some leftover melted chocolate after everything is said and done. You could just eat the rest with the spoon, that is a totally fine option. However, to ensure you use every last drop, I have a suggestion. Heat up a cup of dairy-free milk (or milk of choice) and add the chocolate, mix it up and bring it to a low boil, cut the heat and pour into your favourite mug, you now have yourself a mug of hot chocolate!
ANOTHER OPTION: Alternatively, when you create the mixture instead of creating a block to make the bars you could just scoop out clusters with a spoon and spread them across the tray if you prefer smaller round bite-size pieces.